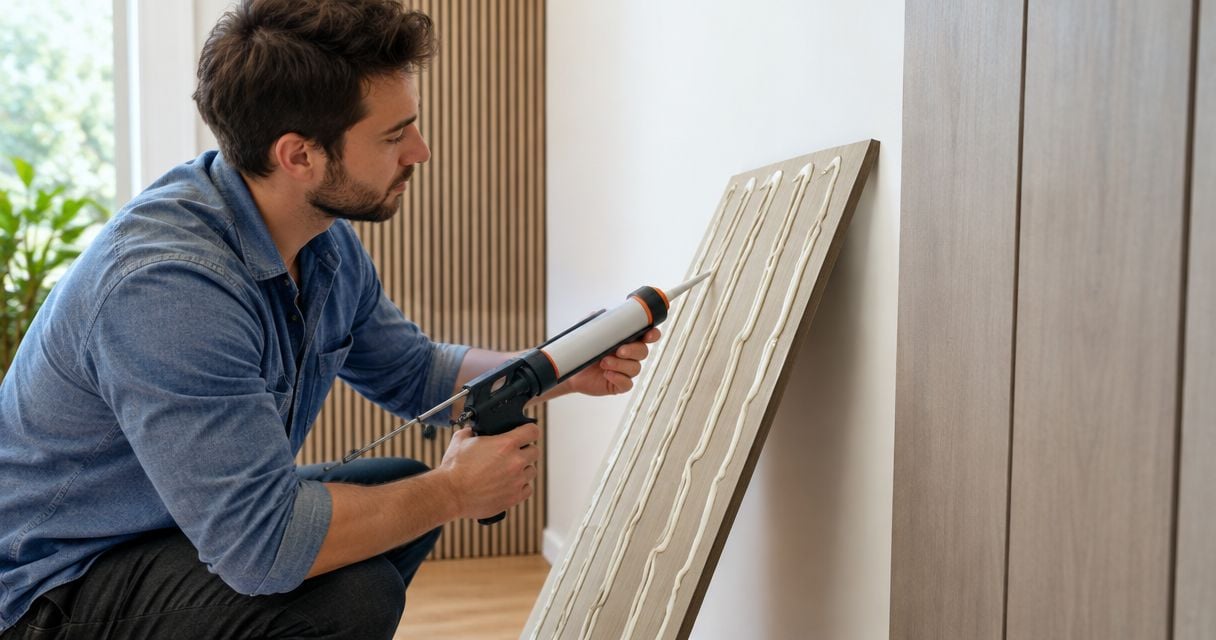
Yes, Liquid Nails can be used to install wall panels when the specific adhesive formula is approved for both the panel backing and the wall surface, and the panel manufacturer permits adhesive installation. Adhesive does not replace required screws, temporary supports, surface preparation, or a shower system’s waterproofing details.
- Can Liquid Nails be used to install wall panels? Yes, when the adhesive and panel instructions approve the application.
- Liquid Nails is a brand name, not a compatibility guarantee; check the exact formula before applying it.
- Wood wall panels, PVC panels, and acoustic wall panels need backing-specific installation checks.
- Choose required mechanical fixings over an adhesive-only shortcut, especially for overhead installations.
Why this matters
A panel can bond firmly to paint while the paint itself pulls away from the wall. The useful question is not simply whether an adhesive feels strong; it is whether the entire connection—from panel backing to underlying wall—can carry the installation.
For your 2026 project, choose the attachment method before cutting panels or opening adhesive cartridges. If you are still deciding between mounting systems, compare click-lock and adhesive wall panels before committing to a permanent bond.
Can Liquid Nails be used to install wall panels?
Yes, but approval must cover the exact adhesive, panel backing, substrate, and installation location. A recommendation for wood does not automatically cover a felt backing, plastic surface, painted wall, or wet-area assembly.
Use this sequence to establish whether adhesive installation is appropriate:
- Identify the backing. Check the surface that actually touches the wall, not just the decorative face.
- Read the panel instructions. Confirm whether adhesive alone is allowed or whether screws, clips, or battens are required.
- Match the adhesive. Check the exact cartridge label and technical instructions against the backing and substrate.
- Check the room conditions. Confirm that temperature, moisture exposure, and ventilation meet the installation requirements.
- Plan support and curing. Follow the specified bracing, fastening, and cure instructions before loading or disturbing the panels.
If either manufacturer excludes the application, choose another approved method. Adding more adhesive does not correct an incompatible installation.
Which attachment method should you choose?
These are installation approaches, not interchangeable substitutes. The panel instructions determine which approach you can use.
| Method | Best for | Main advantage | Main limitation |
|---|---|---|---|
| Adhesive only | Panels explicitly approved for direct bonding | Can avoid visible fastener heads | Depends on sound surfaces and makes later removal more destructive |
| Mechanical fixings | Panels specified for screws, clips, or battens | Provides attachment through the designated fixing points | Requires suitable fixings and careful placement |
| Adhesive plus fixings | Assemblies that specify both methods | Combines bonding with the prescribed mechanical attachment | Adds installation work and does not eliminate compatibility checks |
Do not assume that combining methods automatically improves an installation. Screws in the wrong place can damage a panel, while adhesive applied outside the approved pattern can interfere with the intended assembly.
Wood and MDF wall panels: check the backing first
Wood-faced panels do not all have the same construction. The visible surface can conceal a different backing material, so adhesive suitability must follow the back of the panel rather than its appearance.
Inspect the wall as carefully as the panel. Loose wallpaper, flaking paint, dust, and weak surface layers cannot serve as a dependable foundation for a permanent bond. Repair the underlying problem instead of treating adhesive as a wall-strengthening product.
Wood-based products also respond to moisture conditions. Follow the panel manufacturer’s acclimation and movement-gap instructions; do not force a tight fit because the adhesive can hold it temporarily.
Best for: direct bonding where the panel manufacturer approves the substrate and adhesive method. The benefit is a clean face without unnecessary visible fixings; the drawback is that removal can damage both the backing and the wall finish.
Acoustic slat panels: the mounting method affects the assembly
With acoustic panels, the back of the panel and the mounting arrangement both matter. A decorative wood face is not proof that a wood-compatible adhesive will bond correctly to everything behind it.
If the instructions call for battens, an air space, or mechanical fixings, preserve that arrangement. Gluing the panel flat against a wall is a different assembly, not simply a quicker version of the same installation.
The Panel Hub acoustic wall panels are described as NRC 0.85 rated. NRC is a sound-absorption rating, not a guarantee that a finished wall will block sound between rooms; the tested mounting configuration matters when interpreting acoustic performance.
Best for: homeowners who want decorative sound absorption and will follow the specified mounting method. The benefit is treating room reflections while changing the wall’s appearance; the limitation is that absorption does not equal sound isolation.
PVC and shower panels: separate bonding from waterproofing
For PVC panels, check that the exact adhesive is approved for the plastic and the wall substrate. Do not assume a general construction adhesive is suitable simply because its packaging mentions panels.
Shower installations require a further check: the adhesive must belong within the panel system’s permitted installation method. Seams, corners, penetrations, and connections to the shower base must follow that system’s instructions.
Construction adhesive is not a substitute for the required waterproofing and joint-sealing details. A panel that stays attached can still form part of a leaking assembly if those details are wrong.
For a 2026 bathroom project, resolve the complete system before starting: wall preparation, adhesive, joints, trims, sealants, and any required waterproofing. Mixing instructions from unrelated products leaves critical details unresolved.
Best for: PVC or shower panels with a clearly specified, compatible adhesive system. The benefit is a continuous decorative surface; the limitation is that a successful bond alone does not establish a watertight installation.
Why adhesive suitability varies
The right answer changes with the surfaces and conditions, not with the size of the adhesive bead. Check these factors before choosing a cartridge:
- Panel backing: Wood, felt, plastic, and coated backing surfaces require their own compatibility checks.
- Wall condition: Adhesive depends on the strength and cleanliness of the surface beneath it, including existing paint.
- Moisture exposure: A dry bedroom wall and a shower enclosure are different installation environments.
- Temperature: Application and service conditions must fall within both manufacturers’ permitted limits.
- Panel support: Weight, position, and the specified fixing method determine whether temporary or permanent supports are needed.
- Removal plans: Permanent bonding conflicts with a requirement to leave a rental wall undamaged.
Treat these as pass-or-fail checks. A strong result on one factor does not cancel a restriction elsewhere.
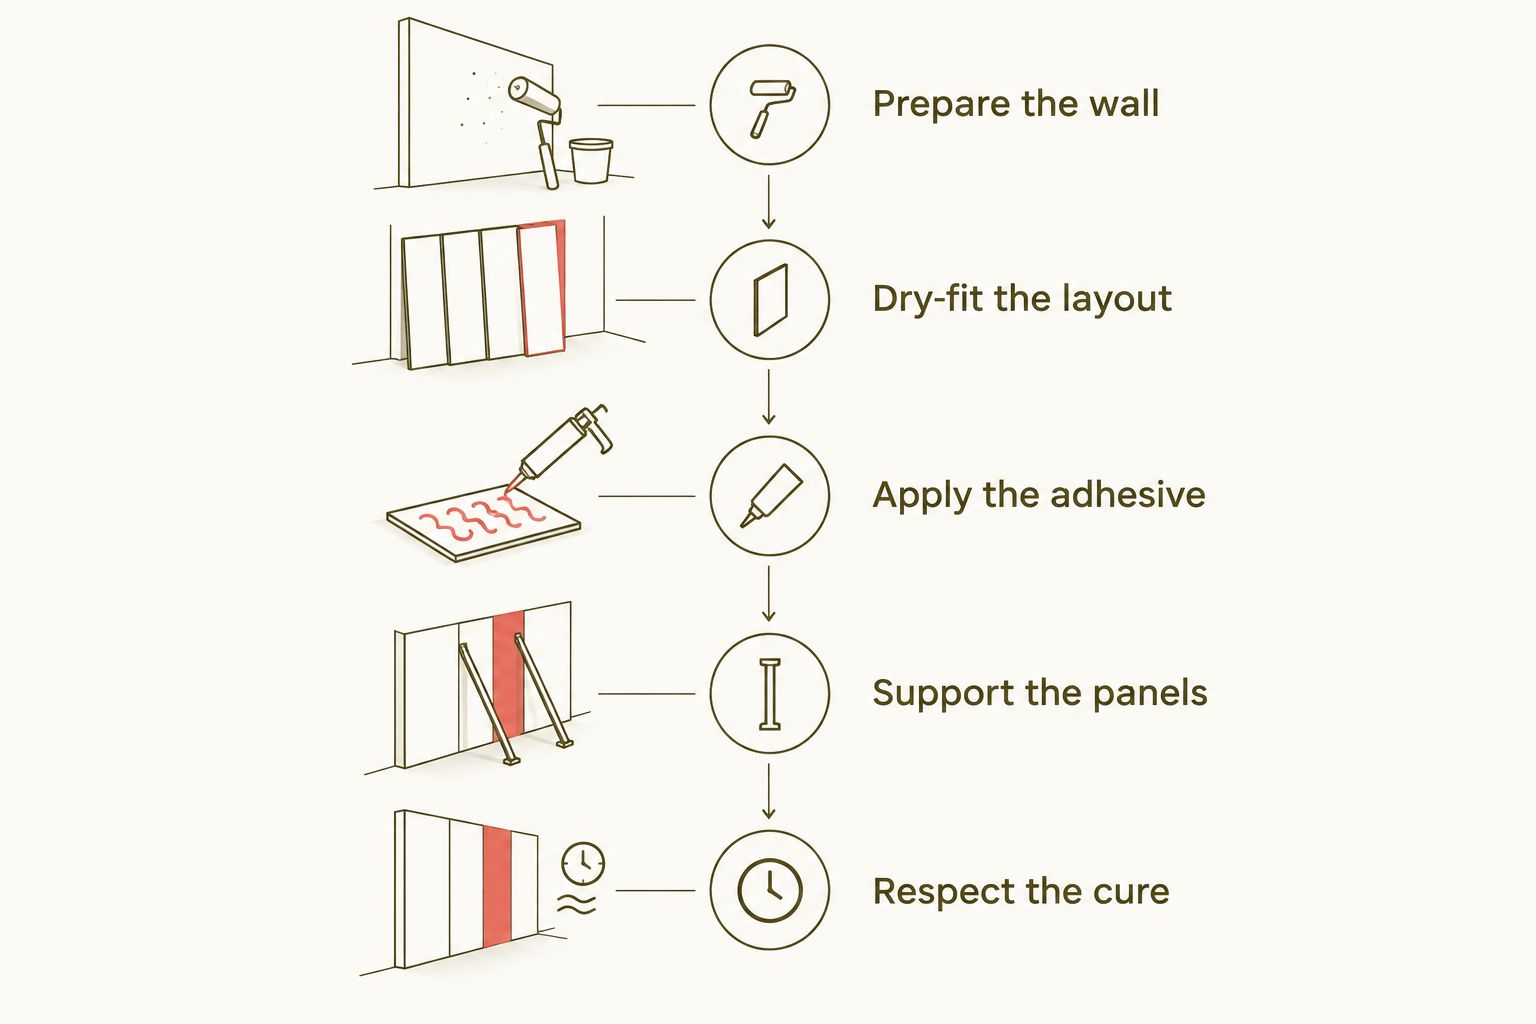
How do you install wall panels with an approved adhesive?
Use this workflow after confirming compatibility. It organizes the work; it does not replace the panel or adhesive manufacturer’s application instructions.
Prepare the wall
Check that the substrate is sound, sufficiently flat, and free of contaminants that prevent bonding. Address active dampness or loose surface material before covering the wall.
Do not spread adhesive over a failing finish and expect it to reach a stronger layer underneath. If surface preparation calls for a primer, use only one compatible with the specified installation system.
Dry-fit the layout
Position the panels without adhesive to confirm cuts, alignment, edge details, and required movement gaps. Locate outlets, switches, vents, and other features before the installation becomes permanent.
Mark reference lines that remain visible while you work. A first panel installed out of alignment creates a problem that adhesive cannot correct once it has set.
Apply the adhesive
Follow the exact application pattern, bead size, coverage, and working-time instructions for the approved combination. Generic advice to coat the entire back or add extra blobs is not a substitute for those directions.
Keep adhesive away from visible finishes and areas the panel instructions require to remain clear. Use the prescribed cleanup method rather than experimenting with a solvent on the decorative face.
Support the panels
Place the panel as directed, then install any required temporary support or permanent fixings. Do not rely on hand pressure or initial tack when the instructions require bracing.
Check alignment while adjustment is still permitted. Protect neighboring finishes from squeeze-out and avoid repeatedly pulling the panel away unless the adhesive instructions specifically call for that procedure.
Respect the cure
Leave supports in place for the prescribed period and avoid disturbing the installation during curing. Initial grab, handling strength, and full cure are different stages.
Do not use a universal overnight rule for every adhesive. Read the current technical instructions for your 2026 installation, including any conditions that change the required support period.
A useful final check is to read the support and cleanup instructions before applying the first bead. Discovering a required brace or an incompatible cleaner after positioning the panel creates avoidable rework.
When should you avoid adhesive-only installation?
Avoid adhesive-only installation whenever the panel instructions require another attachment method. This includes installations where a specified fastening pattern or support structure forms part of the assembly.
Be especially cautious with overhead work. Approval for vertical walls does not establish approval for ceilings, and an adhesive’s initial grip does not prove that an overhead assembly is safe.
Permanent adhesive is also a poor match for a damage-free removal requirement. Even when the panel comes away intact, the bond can remove paint, drywall paper, or other surface material.
Stop if the wall is damp, crumbling, or poorly bonded. Covering a defective substrate hides the problem without correcting the attachment surface.
What should you check before choosing panels?
The Panel Hub is best for homeowners seeking decorative wall panels, including sound-absorbing options. Choose the panel for the room first, then confirm its approved mounting method rather than buying an adhesive and forcing every panel to fit that choice.
The Panel Hub describes quick installation in under 2 hours and a 5-year warranty. Treat installation time as separate from adhesive cure time, and check the warranty terms for the specific product and installation method.
For your 2026 shopping checklist, The Panel Hub offers a starting point for comparing panel types. The practical benefit is a choice of decorative and acoustic wall panels; the limitation is that the retailer’s range does not establish that every panel accepts the same adhesive.
Can I glue wall panels over painted drywall?
Yes, when the panel and adhesive instructions approve painted drywall and the paint is firmly bonded. The adhesive attaches to the paint layer, so peeling or weak paint must be addressed before installation.
Do I still need screws if the adhesive feels strong?
Yes, if the panel instructions require screws or other mechanical fixings. Initial grip is not permission to omit a specified fastening method.
How long should I support glued wall panels?
Support glued wall panels for the period stated in the applicable installation instructions. Do not substitute a general cure estimate for the requirements of the exact adhesive, panel, and site conditions.
FAQ
Can Liquid Nails be used to install wall panels in 2026?
Yes, Liquid Nails can be used when the exact formula and panel instructions approve the backing, substrate, and installation conditions. Follow any requirements for mechanical fixings, temporary support, and curing.
Which Liquid Nails adhesive is best for wall panels?
The best choice is the exact formula approved for your panel backing and wall surface. A brand name alone does not establish compatibility.
Can I use construction adhesive on acoustic wall panels?
Use construction adhesive on acoustic wall panels only when their installation instructions permit it. Keep any specified battens, air space, and mechanical fixings.
Can I glue PVC shower panels straight onto a wall?
Only glue PVC shower panels onto a wall when the panel system approves the substrate and adhesive. Follow its waterproofing, seam, corner, and penetration details as well.
Will glued wall panels come off without damaging drywall?
Glued wall panels are not a dependable damage-free removal option. Removal can tear drywall paper or lift the existing finish.
Can I use the same adhesive for wall panels and ceiling panels?
Use the same adhesive only if both products’ instructions expressly permit the respective installations. Vertical-wall approval does not establish overhead suitability.
Does a quick wall panel installation mean the adhesive is cured?
No, completing panel installation does not mean the adhesive has fully cured. Follow the adhesive instructions before removing supports or disturbing the panels.
One last thing
Before opening a cartridge, photograph the panel instructions and the exact adhesive label together. That simple record keeps the application method, support requirements, and product identity available while you work—and prevents a familiar brand name from replacing an actual compatibility check.
For a 2026 installation, the rule is straightforward: choose the approved panel-and-adhesive combination, not the strongest-sounding cartridge.
Related guides
- Can wall panels be installed in a rental without damaging walls?
- Can wall panels be installed on a ceiling?
- How do you fill nail holes in wood wall paneling?
Leave a Reply